Creating a new campaign
To create a campaign, click Create on the Campaigns tab.

Main settings

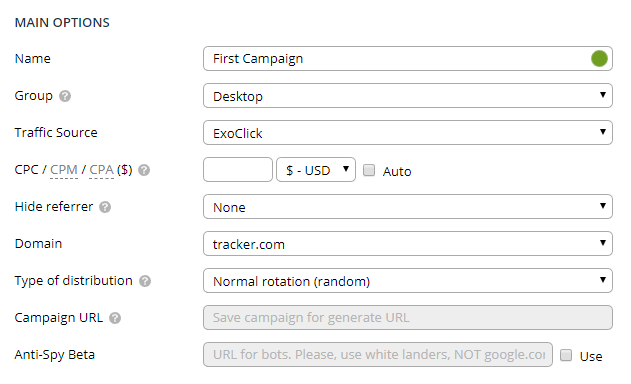
Name
Name your campaign. You can also click the round icon at the end of the field and choose the color for your campaign. Colors help you quickly filter your campaigns (#red #orange #yellow #green #cyan #blue #darkblue #violet #pink #brown #grey):

Group
Select a group for your campaign. It’s convenient to group campaigns by verticals, countries, and type of traffic. You can also create a new group by selecting Add new in the group list. Once you save your campaign, the new group will be created with the campaign in it.

Traffic source
Select the traffic source. You have to add it in advance on the Traffic Sources tab. (more...)
CPC / CPM / CPA
Specify the payout method and cost per click that you pay to buy the traffic.
CPC — cost per click
CPM — cost per 1000 clicks
CPA — cost will be assigned with conversion (when the traffic source Postback URL is triggered)
If your traffic source sends cost info in the link, check the Auto box (more info).
If you select CPA and check Auto, the conversion payout will be multiplied by the Payout % in this campaign, producing the cost of the click (revshare mode). Please note that in this case it is required that the postback from the traffic source gets triggered (this can be affected by the Postback % and S2S postback mode settings).
You can also select the currency and Binom will automatically convert the cost to dollars according to the Central European Bank exchange rate.
Hide referrer
Hide your landing page from the offer network. If you don't use custom scripts to substitute the referrer, we recommend you select Meta Refresh. (more...)
Domain
Select a domain your Campaign URL will be generated on.
Type of distribution
Here you can choose the traffic distribution method:
Normal Rotation — a completely random choice of route based on weights of the path/landing/offer
Smart Rotation — smart distribution of clicks based on uniqueness and user conversions on the path/landing/offer
Fix On — fixing a user on a certain path/landing/offer
Сampaign URL
A link you will send your traffic to. It’s generated after saving the campaign. It contains all tokens configured for the traffic source.

Advanced settings

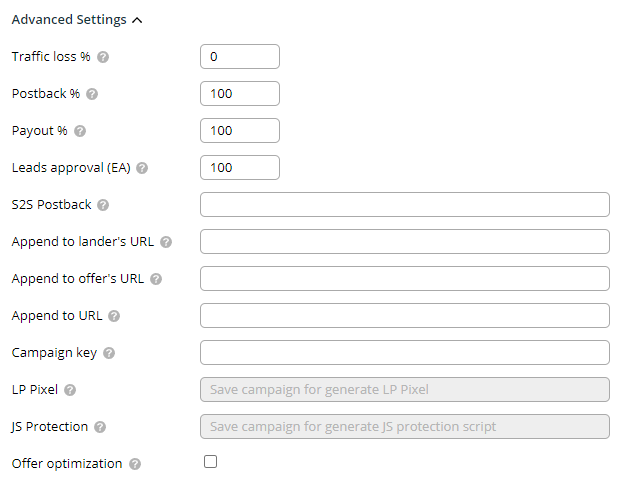
Traffic loss
The percentage of traffic loss for a campaign. When working with a traffic source a certain percentage of traffic gets lost on the way to the tracker. The traffic loss can significantly vary by country. You can specify the percentage in the traffic source or for each campaign. The default value is the same as in the traffic source.
It's calculated as follows:
new CPC = CPC / ( 1 - ( losses / 100 ) )
Postback %
You can specify a percentage of postback to be received by the traffic source (from 0% to 100%). For example, if you specified 50% in the Postback % field and had 1000 conversions, then the traffic source will get the postback about 500 of them.
Postback % specified in the campaign settings overrides Postback % specified in the traffic source settings.
Payout %
You can specify a percentage of payout from CPA conversions to be received by the traffic source (from 0% to 100%). For example, if you specified 50% and got $10 per conversion, then the payout to the traffic source will be $5.
Leads approval (Expect Approve)
The expected confirmation rate (from 0% to 100%). It's used in the E-commerce status scheme. (more...)
S2S Postback
This is the individual Postback URL to send conversions to the traffic source or some additional services. Open Advanced Settings of your campaign and paste the postback link into this field. By default, the traffic source postback works (if it's specified).
-
Parameters to transfer through S2S
-
Token Description {clickid} Click ID {user_id} User ID {campaign} Campaign ID {campaign_name} Campaign name {path_name} Path name in campaign {rule_name} Rule name in campaign {campaign_key} Campaign key {trafficsource} ID of the traffic source {trafficsource_name} Name of the traffic source {externalid} Traffic source token External ID {clickcost} Click cost {domain} Campaign domain {lander} Landing ID {referer} Click referer {time} Click time {htime} Encrypted click time {device_name} Device marketing name {device_brand} Device brand {device_model} Device model {browser_name} Browser name {browser_version} Browser version {resolution} Display resolution {os_name} User's OS {os_version} OS version {country} User's country {country_code} Country code {language} Browser language {city} User's city {isp} ISP {ip} IP address {user_agent} Browser's user agent {offer} Offer ID {payout} Payout {referer} Referrer {t1}, {t2}, {t3} ... {t10} Traffic source tokens (1, 2, 3 .. 10) {event1}, {event2} ... {event10} Events (1, 2, 3 .. 10) {tName:NAME} Traffic source tokens by name ({tName:zoneid})
-
Append to lander’s URL
Adds the given list of parameters to all of the campaign’s landings. All tokens are available.
Append to offer’s URL
Adds the given list of parameters to all of the campaign’s offers. All tokens are available.
Append to URL
Adds specified parameters to the Campaign URL.
Campaign key
Allows you to change or specify the end of your campaign link. (more...)
LP Pixel
A code for the landing page that allows you to send the traffic directly to the landing page, bypassing the tracker. (more)
JS Protection
A code for the landing page that allows you to send the traffic directly to the landing page and change it with campaign's settings. (more)
Offer optimization
Setting for optimizing offers weights in paths. (more)
Traffic distribution
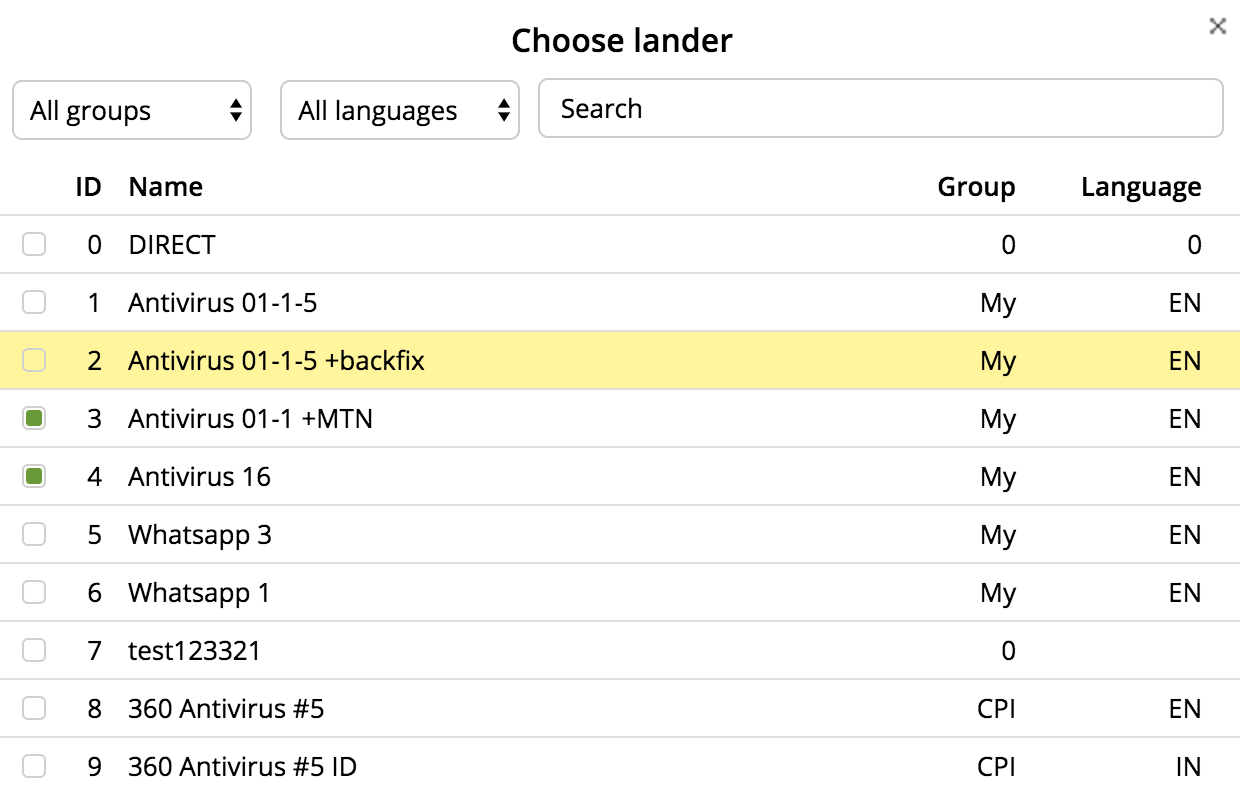
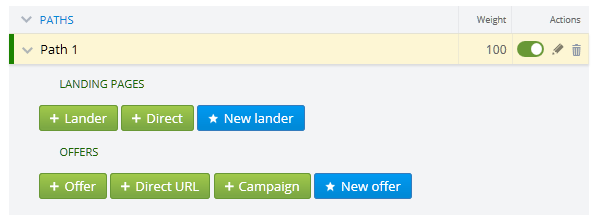
Now it's time to choose the traffic path. Click Lander and select the landing page in a new window. If you want to work with a direct link to the offer, just click Direct.

You can select the offer the same way: click Offer and select it in the window. Click Direct URL if you want to send traffic to a URL. Click Campaign if you want to send traffic to a campaign. When sending clicks to another campaign it gets all the relevant tokens as well.
Also, you can add a new landing page or a new offer while you're on this page (New Lander and New Offer buttons respectively). Click Add Path if you want to add one more path to your campaign.

When finished, click Save at the top of the page.
Video
